Installation Instructions
Table of Contents
Overview
Below are the detailed instructions for the a NEW and Update installations of XDOC. Also, detailed information on the install and startup of the Axacore.Xdoc.Service.OCR.exe service for the AIVA Document integration and delivery.
NOTE: It is recommended that a single Axacore OCR Service (Axacore.XDoc.Service.OCR.exe) be installed only once per XDoc installation. Multiple instances on the same installation are not supported and may cause errors.
XDoc Build 6153 - Clean Installation
Pre-Installation Requirements:
- Download latest XDoc 6153 media
- Microsoft Visual C++ Redistributable for Visual Studio 2015, 2017 and 2019
- .NET 4.8
- Windows Features - IIS
Install Steps:
- Install Media
- Unzip XDoc media to a temp folder – C:\<temp>
- Create a new XDOC folder - C:\XDoc
- Copy all contents from <temp> to the new XDOC folder
- Install the Services
- Open a Command Prompt as an Administrator
- From the C:\XDoc folder install the following services:
- axAllservices.exe -install
- axDispatcher.exe -install
- axRenderagent.exe -install
- From the C:\XDoc\deploy folder install the Axacore.XDoc.Ocr service:
- Copy the C:\XDoc\deploy\Program Files\Axacore\XDoc\Axacore.XDoc.Service.Ocr folder to C:\Program Files\Axacore\XDoc\Axacore.XDoc.Service.Ocr.exe”
- Copy the C:\XDoc\deploy\ProgramData\Axacore\XDoc\bootstrap.config file to folder C:\ProgramData\Axacore\XDoc folder
- Open C:\ProgramData\Axacore\XDoc\bootstrap.config and replace the variables {SERVER}, {DATABASE}, {USER} and {PASSWORD} with the appropriate values in the database connection string. The password value is plain text.
- From an Administrator prompt run:
sc create Axacore.XDoc.Ocr binpath="C:\Program Files\Axacore\XDoc\Axacore.XDoc.Service.Ocr.exe"
- Create the websites
- Open a Command Prompt as an Administrator
- From the C:\XDoc\deploy\WebSiteTemplates folder run both:
- wxWebSite.exe
- wxWebSiteWorkflow.exe
(verify in IIS Manager both sites were created and started)
- Create the Database
- Open SSMS
- Create a new database named xdoc
- Run the following sql files:
- C:\XDoc\deploy\DatabaseScripts\BaseInstall\xd6_axcm_base_install.sql
- C:\XDoc\deploy\DatabaseScripts\UpdateInstall\xd6_axcm_update_install.sql
- Run the following stored procedure to create the default users
- exec axcm.xdba_xapp_dbLoginCreateAxDefault @pDoExe=1, @pDoExeCmds=1, @pDoRebuild=1
- Set database connection settings
- Edit file C:\XDoc\xapp_cfg.xml
- Update the database hostname and port settings where you created your XDOC database
- <DbConnHostname>127.0.0.1</DbConnHostname>
- <DbConnPort>5610</DbConnPort>
- Update the database hostname and port settings where you created your XDOC database
- Edit file C:\XDoc\xapp_cfg.xml
Post-Installation:
- Start the service - XDOC.AllServices
- Start the service – Axacore.XDoc.Ocr
- Restart IIS – iisreset
- Open a browser to localhost and logon
- Username: admin
- Password: password
- Update Document Stores accordingly in Admin-System-System Resources-Document Stores
- Configure any custom Integration settings in the Admin Section
XDoc Build 6153 – Update Installation
- Pre-Update
- Download the latest XDOC Version to temporary folder
- In the temporary folder, unzip the XDOC software.
- Database update
- Stop all XDOC services ( Stop XDOC.AllServices )
- Stop IIS websites for XDOC ( iisreset /stop )
- Backup current XDOC database
- Run XDOC update script located at:
- <unzip location>\deploy\DatabaseScripts\xutil_xdba\xd6_axcm_update.sql
- Software update
- Stop all XDOC services ( Stop XDOC.AllServices )
- Stop IIS websites for XDOC ( iisreset /stop )
- Rename the old XDOC directory to XDOC_LAST
- Create a new XDOC directory
- Copy all contents from <unzip location> to the new XDOC folder.
- Grab the original config files from XDOC_LAST
- XDOC_ LAST \axBootstrap.cfg
- XDOC_ LAST \axSystemConfig.xml
- XDOC_ LAST \axSystemGateway.xml
- XDOC_ LAST \xapp_cfg.xml
- XDOC_ LAST \xapp_cfg_brand.xml
NOTE: If you have any custom files, contact support. DO NOT OVERWRITE ANY OTHER FILES!!
example: Web timeout settings
- Turn back up services
- Start services ( XDOC.AllServices )
- Turn back on IIS ( iisreset )
- Start testing
- Rollback procedure
- Stop all XDOC services ( Stop XDOC.AllServices )
- Stop IIS websites for XDOC ( iisreset /stop )
- Restore Database backup
- Remove XDOC folder
- Rename XDOC_ LAST back to XDOC
- Start services ( XDOC.AllServices )
- Turn back on IIS ( iisreset )
Axacore.XDoc.Ocr
Service Name: Axacore.XDoc.Ocr
- must always be running
Installation directory:
- C:\Program Files\Axacore\XDoc\Axacore.XDoc.Service.Ocr
Bootstrap Config File:
- C:\ProgramData\Axacore\XDoc\bootstrap.config
- contains database connection information
Log File Directory:
- C:\ProgramData\Axacore\XDoc\Logs\Axacore.XDoc.Service.Ocr
- Contains 2 subfolders
- IntakeWorker – OCR Send queue
- OutputWorker – OCR Receive queue
- Contains 2 subfolders
Configuration Settings:
**After changing any of these settings the Axacore.XDoc.Ocr service must be restarted to apply the new values.**
System Settings are located at Admin-System-AIVA Info-Settings
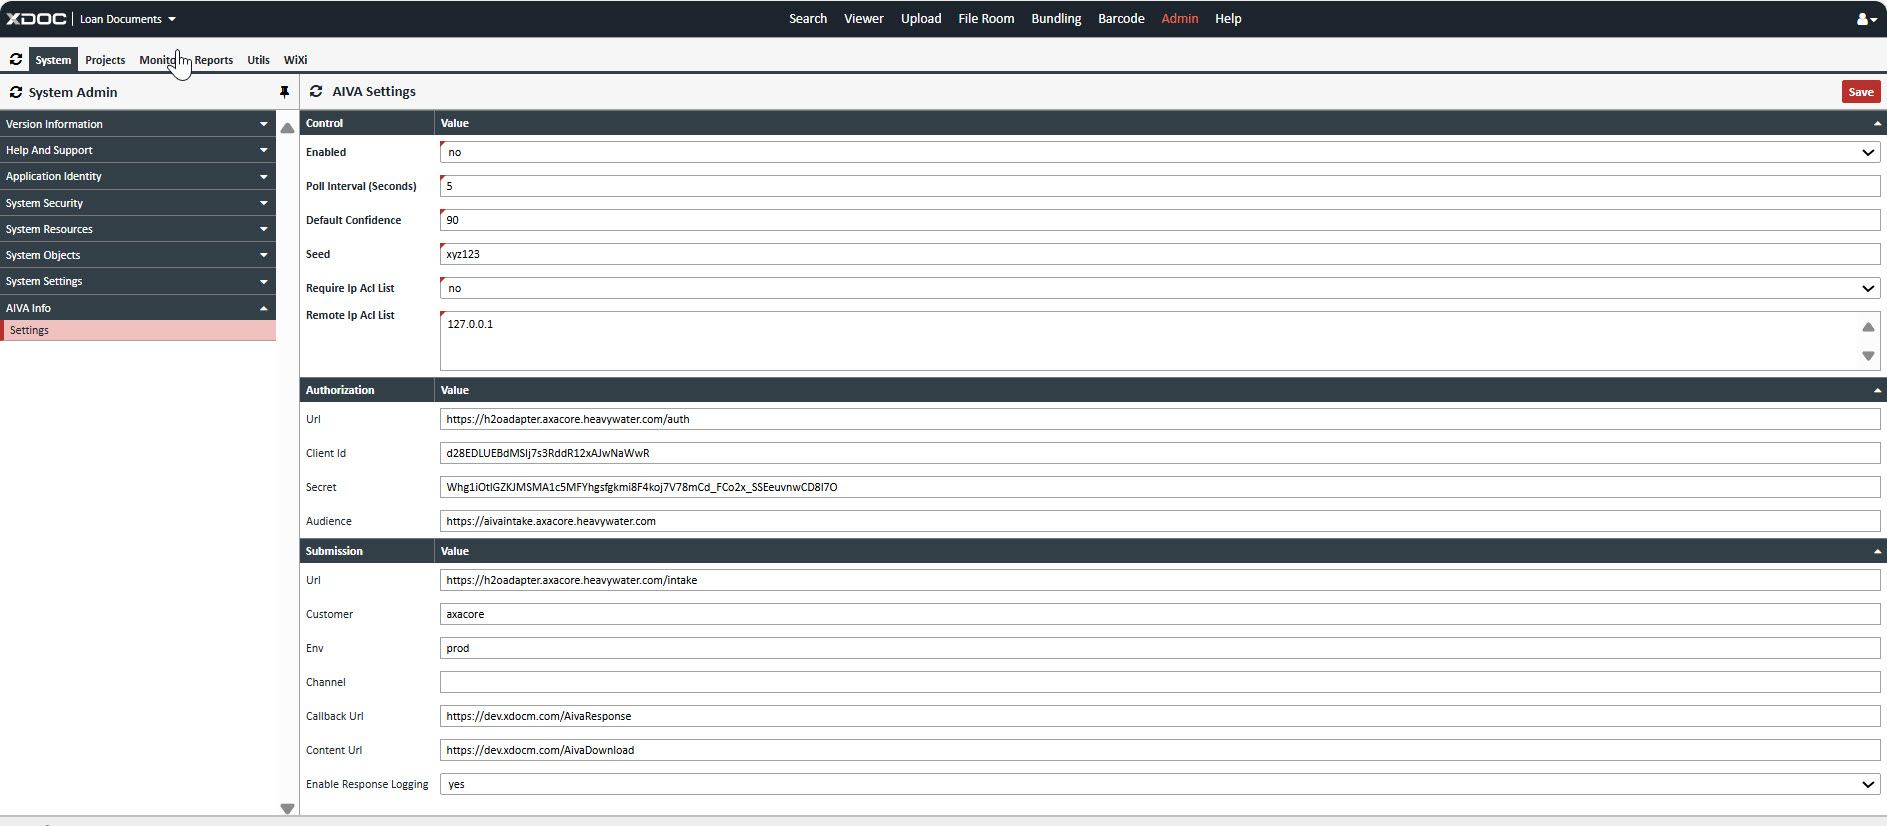
Control
- Enabled: turns on or off AIVA processing
- Poll Interval: number of seconds to wait between checking for a new completed submission
- Default Confidence: default value for confidence if not set directly on the AIVA doc mapping
- Seed: future use – can be used to seed an auth token to authenticate urls
- Require Ip Acl List: future use – can be used to require an ip access control list
- Remote Ip Acl List: future use - can be used to specify a list of ips to validate access control
Authentication (these are all supplied by AIVA and Required)
- Url: AIVA supplied Authentication url
- Client Id: AIVA supplied Client Id value
- Secret: AIVA supplied Secret value
- Audience: AIVA supplied Audience value
- Callback Url: AVIA supplied Callback Url value
Submission
- Url: AIVA supplied Submission url
- Customer: AIVA supplied Customer value
- Env: AIVA supplied Env value
- Channel: AIVA supplied Channel value (not required)
- Callback Url: XDoc Server Callback url -- /AivaResponse
- Content Url: XDoc Server Content url -- /AviaDownload
- Enable Response Logging: If enabled, logs will be written to axtsvc_avia_response_log
Project Settings are located at Admin-Project-AIVA Info-Settings
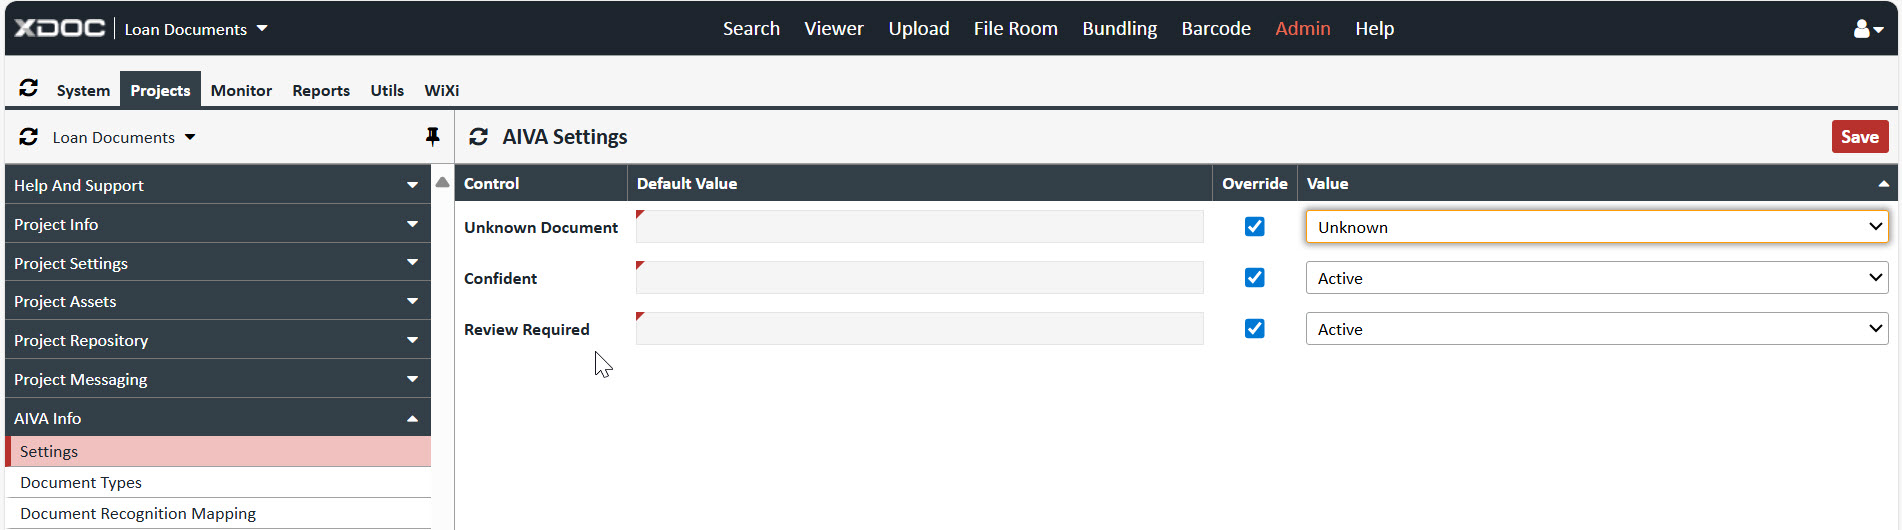
Control
- Unknown Document: default Document Definition for documents not recognized by AIVA
- Confident: Bucket where all documents will be placed if Confidence level is met
- Review Required: Bucket where all documents will be placed if Confidence level is not met
Database Tables:
|
Database Table Name |
Table Description |
Detailed Description |
|
axtsvc_aiva_transaction |
Main table |
This table contains a row for each AIVA submission retaining information, payloads and statuses of the transaction |
|
axtsvc_aiva_response_log |
Log table |
This table contains extra debug logging if enabled in the settings |
|
axtrep_doc_schema_aiva |
AVIA Document Types |
This table stores AIVA Document Types provided by AIVA |
|
axtrep_doc_schema_aiva_map |
XDoc/AIVA Document Type Mappings |
This table contains the mapping relationships between XDoc Document Types and AIVA Document Types that are set in the UI |
|
axtdoc_doc_aiva |
XDoc Document Mappings |
This table contains a row for each XDoc document that has been submitted to AIVA for processing retaining response data, ie AIVA Document Type, Confidence Score |
Transaction Lifecycle:
- The IntakeWorker handles the initial submission to AIVA and inserts a single row in axtsvc_aiva_transaction with its necessary data and two indicators NotificationComplete = 0 and TransactionComplete = 0.
- XDoc waits for AIVA to post several payloads, XDoc updates this table with the times and payloads as received. Once all payloads have been received the NotificationComplete is set to 1. This process currently takes about 15 minutes on the AIVA side.
- Then the OutputWorker polling will pick the submission with NoticationComplete = 1 and complete the processing and update TransactionComplete = 1. The workflow is complete.